Productive and pain
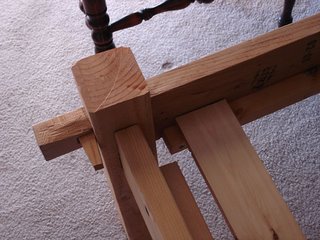
I have to say it was a productive weekend.
The bed is virtually done. I had to re-engineer pegs for it; decided that longer was better, and reduced the angle. We had it put together in the Hall and bounced around on it for some time, in order that we could feel secure that it wouldn't come crashing in upon us at an inconvenient moment.
Robert took it apart and sanded the posts and rails; it only needs a coat or three of tung oil. On thing unexpected did happen; the queen air
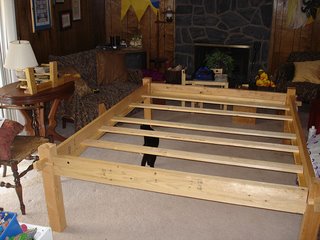 mattress seems very small in it. I checked measurements; the inside dimensions of the frame are 63.75" x 83.75", which is 3.75" wider in all directions than a standard queen. At least we were consistent, and I figure that the extra width ( less than 2" per side) will be amply taken up by bedclothes. However, the air mattress is even smaller - about 9" narrower and wider than the frame. So much for the assumption that the air mattress is a standard queen. It's ok - we don't expect to be using the air mattress forever, and will be replacing it eventually with a more period mattress albeit with a foam core for comfort.
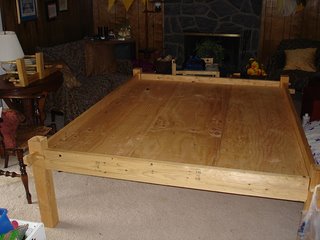
In bouncing about on the thing, we did discover that the whole thing seems to pitch a little like a a waterbed. It seems that the rocking of the joints is transferred to and increased by the air mattress. In addition, I feel like I'm perched atop the mattress, and will probably loose some sleep maintaining my balance.
Although the bedstead is done, the bedding is another matter entirely. Besides the aforementioned Medieval-style mattress, I scored some $1 a yard white linen at Denver Fabrics which will become sheets. And we need blankets. And pillow covers. And (sorry, Robert) a headboard to keep the pillows in place. I have a cunning plan for a headboard, but I know that Robert won't like cutting any new mortises. He's good at them, but they're a complete pain.
There is only one problem with finishing the bed. To use it, we will need to rebuild the Northstar, our 16" round pavilion. The top was the victim of neglect (first) and over-zealous scrubbing to get rid of the resulting mildew (last). It's gonna take 20 yards of canvas and a weekend to get a tent in which our decadent bed will fit.
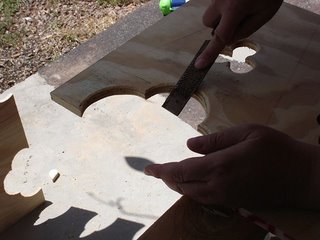
The bed wasn't the only accomplishment this weekend. I nearly built eight sets of table legs for period camp dining. For the first set I did - legs for the kitchen tables - I was clever enough to make a template of the triangle-shaped brace that creates the characteristic shape of Gothic-style table legs. So it's pretty easy to lay out a half-dozen of the things on a 2' x 4' sheet of plywood. After cutting out the trefoil and cusps with a jigsaw, I then give the cut-outs some dimension with a rasp. The look is similar to that achieved with a router, but more rustic. Since the jigsaw is fairly imprecise, the rasp also lets me refine the shapes and fix any bobbles. After I have finished all the sawing and shaping for all six braces, I then cut the braces apart. Leaving them all together makes it easier to manage them ; the weight and length of the panel provides some stability when doing the shaping.
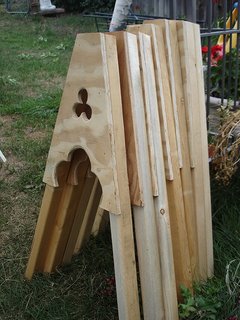
The braces are then nailed with finishing nails to the legs. (What happened to the days when I could drive a nail in three strokes?) The 1x1 legs are cut at 75 degree angles to get the "A" shape, and so that the bottoms of the legs rest flat on the ground. The dining-height legs are cut to 28.5", which with the addition of a crossbeam and the table top should make approximately 30", the height of a standard modern dining room table.
The legs are painted with "milk paint", a period type of paint. It happens that when I visited the local woodcraft shop, the "milk paint" didn't have any milk in it at all - I'm pretty sure it's really a latex. But the color is good, a bright barn red.
The legs aren't stained because I want a more typical (period) finish. Although stain was not unknown, wooden surfaces were usually finished with a clear medium like linseed oil or beeswax, or painted.
The first set of legs (the kitchen "counters") was patterned after the three-legged "sawhorse" shapes seen in many Medieval manuscripts. Legs in Luttrell are seen with the "A"-shaped braces, and although we cannot see the back leg(s), it's easy to assume the three-legged variety based on some of the other tables that we see in the illuminations. However, we found this arrangement to be somewhat rickety. There are a couple of modifications that might help the situation.
1) I could add a horizontal stretcher to the "A", which would be in turn attached perpendicularly to the rear single upright leg. The problem is breaking down this arrangement into something packable.
2) I could use an "A" on both sides of the table, changing the arrangement from a tripod to a quadripod. This would strongly resemble the modern sawhorse, and would be easy enough to engineer as a break-down design for transport, but I have not yet been able to justify the "sawhorse" design as period. Of course, I would need twice the number of "A"s, which would equal four to a table. Handily, I have 7 built currently and another 6 begun on another panel. I could easily get enough done for two tables before Three Stags.
Three Stags is of course the objective and one of the reasons why these weekends need to be productive. Evan's bed remains to be finished, and I need to complete at least one dining-height table by then. And clothes - we need clothes. The pace is frenetic, and I have pushed myself beyond where I should have gone today. My right hand and wrist are very sore from the continual sawing, rasping and ultimately painting (I got most of the painting done on the legs before the rain came in tonight). I've got Advil on-board, or I'd not be typing right now.
I expect that Advil will continue to be my friend as I over-extend myself in the next three weeks.

2 Comments:
(dance of joy) No more sleeping on the ground!
hey that looks familiar...
Post a Comment
<< Home