
Northstar Beginnings
Today started too early considering the time yesterday ended. We languished in bed until Evan began trotting about the house at 8:30. After breakfast I unpacked the remains of the Northstar - the ropes still woven to the steel ring, and the supporting chain structure. While Robert and Savina picked off the leftover rotten canvas and the leather sheath, I made a run to the hardware store.
The morning had started out rainy, but by the time I returned home, the driveway had dried enough to implement Plan A - cutting the canvas outdoors. With the sun beating down, we quickly decided that this project could only be completed if we donned dark sunglasses; we found ourselves "snowblind" from the sun on the white canvas. I had intended to cut the 11' 4" triangles that I'd cut for the first Northstar, but after some discussion with Savina decided to refine the shape a bit.
First, the 11' 7" (includes 3" added for seam allowances) length of the hypotenuse was marked on the selvedge. The the same measurement was marked from the top of the triangle to the opposite selvedge - I highly recommend using a chalk line to get a long straight line. Using the top of the triangle as a pivot point, we then marked a curved edge to the bottom of the triangle. The basic shape is apparent in the photo to the right.
Next, we measured 21" down from the top of the triangle. 21" is the length of the chain assembly that supports the peak of the tent. Figuring that 3" of seam allowance should be needed on the top of the panels, we then backed the measurements up the triangle. Again using the top of the triangle as a pivot point, a curve was marked.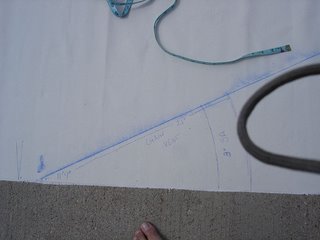 The picture at the right is the layout of the measurements (sorry about the camera strap!). We then cut out this first panel - the picture above is our first panel. This panel was then the pattern for the remaining 9 panels. As it turns out, that extra yard of fabric did come in handy; we've got about a foot left of the 21 yards I purchased.
After we got the panels cut out, we moved the operation indoors as the sunshine was getting rather intense. The next step was to install grommets in the seams between the panels. The seams will carry the ropes from the peak assembly to the stake-out points on the ground, and they need an exit. Each grommet was set into a reinforcing square of canvas.
While Savina and I were cutting canvas, Robert was preparing poles. The Northstar requires two kinds of poles - a "kingpole" - the center supporting pole, and roof line poles which support the round shape. Both types of poles require some engineering.
The kingpole needs to be very strong to support the weight of the tent, and it has to be transportable, which means that it has to break down into two pieces. Northstar I had a very clever assembly - the two halves of the steel pole were fitted together with an internal structure of wood and copper which provided rigidity across the seam. The two halves were then locked together with a bushing. If I remember correctly, the pole was 1 1/4" steel pipe. I have opted to rebuild the pole using a similar design. There are some differences based upon what was available at the hardware store then and what was available on Friday. I was able to get both pieces of pipe with threads at one end (the pipe was unthreaded for Northstar I), and a joint which screws together the halves of the pole. To create horizontal stability, Robert epoxied 24" of closet pole into one half of the pipe. To assemble, the closet pole end is slid into the hollow end of the pipe, and the joint is tightened. Steel is obviously not a period material for a kingpole, but for this size of pavilion (and considering the wind it's likely to encounter) a compromise has been made for structural integrity and safety.
The roof line poles need to be lightweight and flexible. We're not using vertical poles at the roof line, and so there needs to be support. There is speculation that round tents in period may have utilized flexible wood support for the roof line, but this is largely conjectural. We're using 3/4" PVC poles to provide the support. The PVC will be completely covered, since I would consider it to be a glaring inconsistency in a period tent. The PVC is contained in a sleeve situated between the valance and the Dutch lacing (details when we get to that part). Each length of PVC has a dowel epoxied into one end; the dowels fit into the hollow end of the next pole, creating a continuous hoop. If the hoop is fit correctly, it's a bit of a struggle to get the last dowel into the first length of PVC, but the seamless result is worth it.
Once the grommets were set, we began to assemble the panels. The panels are joined by French seams, which provide exceptional strength. As mentioned earlier, these seams carry the ropes from peak to ground and at 2" are somewhat wider than what I would normally do.By the time I was "done" this evening, we had stitched together 4 panels, and had pinned the fifth panel to the series.
When stitching such large quantities of fabric, I've found that having a helper to "pull" fabric is indespensible. "Pulling" really isn't the right word - the helper is really controlling the bulk of the fabric. My machine isn't great about feeding, so the helper ends up providing enough tension from the other side of the machine to keep the canvas running through. The helper manages the fabric that's trying to get tangled up at my feet, and maintains the roll of fabric that's being fed under the machine's arm. It helps to keep the panels oriented so that you're only feeding one panel through the machine under the arm - more than one and the volume is simply too great to move the fabric and sew at the same time. This of course implies that sewing that last seam is a monumental challenge - which is all too correct. But you really only want to do that once.
Tomorrow, I anticipate doing that dreaded last seam. When doing some organization in my head this afternoon, it occurred to me that although I planned for enough fabric for the roof panels, I did not consider that I needed fabric for valance and for the roof line poles' casing. I think I'll go over to Denver Fabrics tomorrow afternoon and get some of the $5/yard untreated stuff. It will serve well enough for the "trimmings".
The morning had started out rainy, but by the time I returned home, the driveway had dried enough to implement Plan A - cutting the canvas outdoors. With the sun beating down, we quickly decided that this project could only be completed if we donned dark sunglasses; we found ourselves "snowblind" from the sun on the white canvas. I had intended to cut the 11' 4"
 triangles that I'd cut for the first Northstar, but after some discussion with Savina decided to refine the shape a bit.
First, the 11' 7" (includes 3" added for seam allowances) length of the hypotenuse was marked on the selvedge. The the same measurement was marked from the top of the triangle to the opposite selvedge - I highly recommend using a chalk line to get a long straight line. Using the top of the triangle as a pivot point, we then marked a curved edge to the bottom of the triangle. The basic shape is apparent in the photo to the right.
Next, we measured 21" down from the top of the triangle. 21" is the length of the chain assembly that supports the peak of the tent. Figuring that 3" of seam allowance should be needed on the top of the panels, we then backed the measurements up the triangle. Again using the top of the triangle as a pivot point, a curve was marked.
 The picture at the right is the layout of the measurements (sorry about the camera strap!). We then cut out this first panel - the picture above is our first panel. This panel was then the pattern for the remaining 9 panels. As it turns out, that extra yard of fabric did come in handy; we've got about a foot left of the 21 yards I purchased.
After we got the panels cut out, we moved the operation indoors as the sunshine was getting rather intense. The next step was to install grommets in the seams between the panels. The seams will carry the ropes from the peak assembly to the stake-out points on the ground, and they need an exit. Each grommet was set into a reinforcing square of canvas.
While Savina and I were cutting canvas, Robert was preparing poles. The Northstar requires two kinds of poles - a "kingpole" - the center supporting pole, and roof line poles which support the round shape. Both types of poles require some engineering.
The kingpole needs to be very strong to support the weight of the tent, and it has to be transportable, which means that it has to break down into two pieces. Northstar I had a very clever assembly - the two halves of the steel pole were fitted together with an internal structure of wood and copper which provided rigidity across the seam. The two halves were then locked together with a bushing. If I remember correctly, the pole was 1 1/4" steel pipe. I have opted to rebuild the pole using a similar design. There are some differences based upon what was available at the hardware store then and what was available on Friday. I was able to get both pieces of pipe with threads at one end (the pipe was unthreaded for Northstar I), and a joint which screws together the halves of the pole. To create horizontal stability, Robert epoxied 24" of closet pole into one half of the pipe. To assemble, the closet pole end is slid into the hollow end of the pipe, and the joint is tightened. Steel is obviously not a period material for a kingpole, but for this size of pavilion (and considering the wind it's likely to encounter) a compromise has been made for structural integrity and safety.
The roof line poles need to be lightweight and flexible. We're not using vertical poles at the roof line, and so there needs to be support. There is speculation that round tents in period may have utilized flexible wood support for the roof line, but this is largely conjectural. We're using 3/4" PVC poles to provide the support. The PVC will be completely covered, since I would consider it to be a glaring inconsistency in a period tent. The PVC is contained in a sleeve situated between the valance and the Dutch lacing (details when we get to that part). Each length of PVC has a dowel epoxied into one end; the dowels fit into the hollow end of the next pole, creating a continuous hoop. If the hoop is fit correctly, it's a bit of a struggle to get the last dowel into the first length of PVC, but the seamless result is worth it.
Once the grommets were set, we began to assemble the panels. The panels are joined by French seams, which provide exceptional strength. As mentioned earlier, these seams carry the ropes from peak to ground and at 2" are somewhat wider than what I would normally do.By the time I was "done" this evening, we had stitched together 4 panels, and had pinned the fifth panel to the series.
When stitching such large quantities of fabric, I've found that having a helper to "pull" fabric is indespensible. "Pulling" really isn't the right word - the helper is really controlling the bulk of the fabric. My machine isn't great about feeding, so the helper ends up providing enough tension from the other side of the machine to keep the canvas running through. The helper manages the fabric that's trying to get tangled up at my feet, and maintains the roll of fabric that's being fed under the machine's arm. It helps to keep the panels oriented so that you're only feeding one panel through the machine under the arm - more than one and the volume is simply too great to move the fabric and sew at the same time. This of course implies that sewing that last seam is a monumental challenge - which is all too correct. But you really only want to do that once.
Tomorrow, I anticipate doing that dreaded last seam. When doing some organization in my head this afternoon, it occurred to me that although I planned for enough fabric for the roof panels, I did not consider that I needed fabric for valance and for the roof line poles' casing. I think I'll go over to Denver Fabrics tomorrow afternoon and get some of the $5/yard untreated stuff. It will serve well enough for the "trimmings".
posted by Melanie Unruh-Bays | 10:57 PM
![]()
0 Comments:
Post a Comment
<< Home