From Lijsbet's Desk

Medieval plans, progress, and philosophy

My Photo
Name:
Location: Denver, CO

I am a married mother of two furry children and one naked one. I live in the southern suburbs of Denver, CO, and work for one of the best companies going. My job takes me away from home as much as 75% of the time, so I try to cram as much creativity into the remainder as I can.

8.31.2006

Northstar II

At 6:37 this evening, I stitched the final seam on Northstar II. We then proceeded to test-erect it in the back yard. Everything went well, with one minor hitch; the walls are too short for the king pole. Robert will be sawing off 9" in the morning.

We left the tent up over night.

Links to pictures are at http://goldenlyon.org/northstar.html

Lots of labor, but no cigar

It's sort of like having a baby - you know the steps, you know the mechanics, but really, it'll be done in its own sweet time. No, we haven't been able to test-erect this tent yet, and yes we're now four days behind schedule, but there is significant progress. I think the next time I decide I want to make a large tent, I'll schedule four weekends rather than two.

There were accomplishments yesterday; I got the valance and hoop casing stitched to the tent top, and made a section of the Dutch lacing to fill in the gap. Not without trouble, though. I broke so many needles that I can't count them all. The machine just does not want to go through the ropes. Robert and I even brought up the 1928 Singer treadle machine (easier to bring the machine to the tent, than the tent to the machine) and had the exact same problem. I hand-cranked through the last 7 feet or so of the valance/hoop casing stitching.

What I did not do - and I won't until after Three Stags - is to finish the raw edges of the hoop casing and the valance. I'm going to invest in a machine tune-up before I do that.

While Robert was waiting on the sewing to be completed, he finished the kingpole. It now has a wooden top, nicely rounded for the chains to perch atop, and a long pin to accommodate finial and pennon. The top is a wooden closet pole, epoxied into the steel pipe. He rasped the top of the closet pole into a round shape. I don't know if I can get a pennon done for it, but we'll see. I may sleep very little tonight.

Last night saw us pulling the ropes through the flat-felled seams and out the grommets at the bottom. We used a coat hanger as a needle, and most of the time had to pull the rope out the grommet with a pair of pliers, since the doubled-over rope was too thick to go through. After the ropes were pulled, we had to engineer the support for the fabric tent top.

The ropes serve one major function, and one minor one. Primarily, they hold the king pole upright. Yes, the ropes run through the fabric of the tent roof, and they do support the cone shape of the roof, but they don't actually hold up the roof. The roof must be secured to the steel ring or it will slip down the ropes. Not very far, but far enough to be untenable.

Northstar I had been stitched to the ring by means of a collar which enclosed ring, ropes, and the top edge of each of the panels. It was secure, but hardly elegant. I wanted to improve on the design. I decided that leather patches, 3" x 5" could be doubled over between the ropes and stitched to the fabric. The patches each have holes pre-drilled in them for ease of stitching. The stitching goes through the back of the patch, through the edge of the flat-felled seam on the right, through the front of the patch and then back through the next set of holes. Both sides of the patch run through the flat-felled seam on either side, while the bottom of the patch only goes through the single layer of canvas.

I got four of the patches installed before bed became the only option.

Robert also dug the Northstar I walls out of the garage. We were disappointed to find them in fair condition. They're dirty, and also have become subject to the mildew beast. Some parts seem fine; others are a mess. We'll see what happens when we put the whole thing up tonight.

8.30.2006

Maybe we do get two miracles on this tent

The title of today's post was going to be "Only one miracle per tent", and then...

Although I managed to get out yesterday for more blue paint, it was after supper before I began to finish that blue vine. While at Guiry's, I also picked up a pack of white bristle brushes; the pack included a filbert, which is the brush that I had been wishing for over the last two weeks. The painting went well - better than it had - and the paint was dry by 9:00.

The valance is officially done. Actually the painting is officially done. Which brings us to the next step.

I love it when lots of little pieces become one. For instance, we started out with 10 roof pieces, 4 hoop casings, a strip of Dutch lacing, and a valance made from an unknown number of pieces. That's 16+ pieces of canvas. Once the roof and valance were sewn, we were down to 7 pieces. Last night we stitched the Dutch lacing strip to the roof; the tent top is now in 6 pieces.

When you retro-fit a tent like we're doing, you worry. I worried about the steel ring fitting the peak opening. I am worried about the valance being long enough (or too long). I'm worried about having enough hoop casing that the gaps won't be large. I'm worried that I didn't buy enough PVC. I didn't worry about the strip of Dutch lacing being long enough - after all, we thought we were making the circumference of the tent slightly less than Northstar I.

We should have worried.

As I got to the tenth roof panel (while stitching the Dutch lacing to the roof) it became apparent that the strip I had wouldn't reach the first panel. We were about 2 1/2' short.

Although this gap is easily reparable - I'll simply make a new 2 1/2' strip of Dutch lacing - the implications are rather large, from a work-to-do vs. time-to-do-it-in perspective. The walls in Northstar I fit the Dutch lacing. Therefore, the walls must be too short for Northstar II's roof line.

How can this be? The canvas we used is narrower by about 2", and I know I took a greater seam allowance in the roof panels. This make no sense at all. I guess I'll know for sure when I find the walls and lace them into the roof.

This morning found me digging in the garage before taking Evan to school. I was not looking for the walls, but for some nylon rope of a suitable size for my 2.5' of Dutch lacing. I keep a couple bags of miscellaneous rope in the garage for just such an occasion. However, as I pulled miles and miles of sisal, cotton, and large nylon rope out of the bags, it quickly became apparent that I was not going to find the right size of rope. What I did find was a strip of incomplete Dutch lacing, apparently a scrap from Northstar I, and about the right length. It remains to be seen if there's enough rope attached.

A second miracle? The real miracle will be if I don't have to add a panel to the walls to make them fit Northstar II.

By the way, we broke 4 needles on the tent last night. They just don't like going over the ropes in the Dutch lacing, although they sail right through layers and layers of canvas.


8.29.2006

But for a lack of blue paint

The valance is done!

Well, not quite; there is that annoying lack of blue paint. The red leafy bits are all done in any case. The blue vine is well over half done, but I have to run to Guiry's to get more paint. Still hoping to stitch it together tonight.

I did not draft the design on the last 18" or so, since I don't really know the point at which the valance will end (or begin) and prefer to hand-draw the join when they get together. The reason is that there is quite a lot of "fudge factor" in building a single tent, and all the math in the world won't give a precise measurement of the sewn object.

For instance, I know that I used 60" canvas, which really varies from 58" to 60". Presuming that it is 60", and that there are 10 panels with 4" of seam allowance per panel used at the bottom of the panels, I should have a circumference of 46' 8". Yet, when we measured it, we got 47' plus a few inches. If I cut the valance at 46' 8", we'd be short. The seam allowance on the bottom of the panels must be taken into consideration, too. What's the measurement at the roof line, which is an inch or so above the bottom of the panels? And how accurate would a tape measure be taking that measurement. One would have to be very consistent about the seam allowance. What if we decide to add a fold to the roof line which increased the seam allowance from an inch to three?

See? Fudge factor. It's pretty amazing how much organizing and ruminating your brain can do when you're painting 48' of red leafy bits.

So we cut four 12' panels, for a total of 48' of valance. I have to consider (1) the seam allowances took up 2" per panel, and (2) that I may have to make up that 8' plus even a little more. Thus piecing is not a possibility, but a likelihood. Still, I don't really know how the design is going to have to be modified to fit. There should be no interruption of the motif, after all.

In other news, Robert got Evan's bed fit together last night. We discovered that almost all of the mortises in the rails will have to be rasped out again to accommodate the pegs. Once we have it pegged together, we'll measure and cut the slats and the plywood platform.

Robert also stitched together a bag for the pegs. With ten in ours - one peg for each rail end, and two spares - there's no room for more. So, he'll have to make another.

8.27.2006

Valance

With the completion of the estoile and the hoop casings, the third - outer - layer of the roofline structure looms - the valance. The flat valance seeming more typical of the period than dagged ones, I decided upon painting a foliate decoration on a flat valance from the gold tent in Jean Froissart's Chronicles, which is from 15th century Bruges - my time and place. Robert observed that many of those flat valances seem to reflect motifs from illuminations, and I had noticed this also. The issue is whether the illuminations reflect actual practice, or artistic convention. Being unable to resolve this question with the available resources, I went ahead and drafted the pattern for the illumination.

Another issue is that I have fundamentally changed the color scheme of the Northstar. With the change of the estoile from blue to red, we now have a tent with two distinctive parts. The valance is an opportunity to create some unity if we use both blue and red for the design. Thus the leafy bits are red, and the vine is blue.

I'm using acrylic artist's paint for the blue - it's what I had on hand. The red is the same latex exterior used on the estoile. The 1" nylon/polyester brush that I used on the estoile works well on the leafy parts, although the vine is too narrow for that brush. I'm using a smaller white bristle brush which is working tolerably well. I got the red done on almost half the valance Sunday night, which is somewhat behind the project plan - we had wanted to raise the tent today. Perhaps Wednesday? Monday night will have to be spent finishing the painting, Tuesday is sewing and running ropes. Wednesday will hopefully be The Big Day.

Creeping doubt

We completed painting the estoile on the tent Saturday night; Sunday morning I went back to the research to make a final decision on the design for the valance. While researching, I came to a realization - the Northstar isn't a period tent. Sure, it looks period, and yes, it has a period shape, and period elements, but the differences between the Basel tent and the Northstar might be enough to keep this tent out of a living history camp. This was not my goal.

I realized in a flash that my goal was to re-build the Northstar, a tent which has been completely at home in "period" SCA camps. The structure is completely modern, and the estoile on the roof isn't justifiable through any of the resources I've seen in my recent research. I suppose I had some basis for painting an estoile on the Northstar, but what that was, fifteen years ago, I have no idea. Was it a tent I saw at an event? Always dangerous to assume that the chattel at an SCA event is justifiably period. Was it a painting? Was that painting a period illumination, or a Victorian-era one? I don't recall if I was that discriminating at that time. Nevertheless, just as it's finished, I begin to doubt the wisdom of painting that damned estiole on the roof.

The Basel tent, although a couple-hundred years past my focus, probabaly demosntrates technology in use in the mid-1400's. The "decoration" so prevalent in Gothic tents is strips of fabric sewn over seams, probably as much for strength as for decoration. Instead of grommets - or even hand-worked eyelets, the ropes are secured to the tent by means of an oval leather patch doubled over and stitched to the roofline's edge. A hole in the patch recieves steel hooks, to which the ropes are secured with an eyesplice.

Well, crap.

The long and short of it is that the Northstar will be perfectly servicable for SCA events, but I have to consider building another more authentic tent. Not just because I want to fit in with the living history folks, but because it seems right to me.

8.26.2006

Milestone: the estoile is finished

I returned to painting the estoile after breakfast Sunday morning. With the tent dry, I had the opportunity to make some better arrangements to accomodate the hour or two of drying time. (Additionally, Saturday was damp, which slowed drying time.) I added a low bench to the right side of the tables. This bench supports the two wet rays, while the next two rays are in the process of being painted. With a fan directed on the bench, we were able to paint fairly continuously, rotating the tent after each pair was completed. As we were hitting the bottom of the can and the last two rays by late afternoon, Robert made a run to Lowe's for another quart of paint. I had just scraped out the last of the second can, when he returned. Timing is,.as they say, everything.

Also on Saturday, I rooted through the fabric stash and found ample canvas scraps - enough for the hoop casing, and for bags. I'm not sure it's a miracle, but it sure is fortunate. It's not the treated stuff, but should serve in any case. I cut out the roof cap from one of the larger pieces, and began to decorate it. We wanted to incorporate some gold into the design, and so I decided to add an additional estoile similar to the one that caps this pavilion from the first half of the seventeenth century. This one is gold. Since I'd used the alternating straight/wavy pattern on the roof, I continued this motif on the cap.

Robert cut the remainder of the hoop casing out of the scraps, and measured them for sewing, before we fell into bed.

Getting there

We've almost got two complete dining tables and two complete kitchen tables.

With the front legs finished, I needed to work on the crosspieces and the back legs. I had to make a run to Lowe's for lumber - a 2x4 for crosspieces, and a 2x3 for back legs. Of course I got exactly three of each out of what I purchased; there was a 2x3 scrap for the fourth back leg. But scrap 2x4 isn't so easy to locate. I found a short piece in the garage behind the lumber stack, and discovered that it has a substantial twist. I chose the best end, and hope to make the best of it. Robert got some painting of the crosspieces and legs done this weekend, and he located all the available table tops.

We've got several plywood table tops which we've used in lieu of better, more period joined panel tops. The two 8' x 30" plywood tops will become tablecloth-covered dining tables. The two 6' x 22" joined-panel tables were the ones I used for Caer Galen Cooks. They need to be wider and finished. The crosspieces of the table legs I measured at 28", presuming a 30" wide tabletop. Heh! My math failed me at the lumber store, and I cam home with enough for 22" wide tops! A spare 1x12 from the lumber stack will increase one of the kitchen table tops to 33", but I'll need to go buy 1x12 another if I want two.

The 1x12s are cleated together on the backside by furring strips. I used them unfinished at Caer Galen Cooks, but I really feel like I want to finish them. Suggestions have been made for linseed oil - the kind from the whole foods stores, rather than the hardware store. A friend uses Howard Feed-N-Wax, which I want to try - I had Robert pick up a couple of pints at the Big Tool Box on Saturday. However, although it calls itself beeswax, carnuba wax and orange oil, it also says it has petrolium distillates, so perhaps it will be used to finish Evan's bed instead of on a food-prep surface. Perhaps I'm back to linseed oil for the finish; the important thing is that it has to be food-safe, and I want to be able to clean the surface sufficiently to maintain kitchen hygene.

Back for a minute to crosspieces. I wanted to play with the idea of using two a-legs rather than one - that is to have an a-leg on bothe the "front" and the "back" of the table. The concept is to see what the differences are in stability, especially in dining tables where people are going to be moving around the legs frequently - and maybe inebriated people. Thus I have made four crosspieces which are cut to accomodate the a-legs on both ends.

The picture above shows a number of table parts in various stages of completion. The red parts are table legs (a-legs on the left, crosspieces to the right, and the back legs just visible in front of the crosspieces). The unfinished parts in the foreground are Evan's bed. The table legs lean up against a panel of uncut table leg braces, which in turn rest against a plywood table top. Two more plywood table tops are to the left behind the mitre saw. The plywood table tops are functional only - they'll be covered with table cloths for dining, and replaced with wood panels when feasable. I'm not opposed to using plywood in the period camp; I just don't want it to look like plywood. Thus the use of paint.

8.24.2006

The Dreaded Last Seam has been conquered

Robert and I gritted our teeth and completed the dreaded last seam. It involved shoving about half of the tent through the arm of the sewing machine, while lifting a large percentage of the rest of the tent. At least it's done.

We also made the patterns for the estoile and began the painting routine. We went through a sixth of the paint on a seventh of the rays. I need more paint; fortunately I saved the paint chip, so I can get a fairly reliable match. I still have to paint the valance, and so I have to consider that I need enough paint to finish that as well. And the finial, which is currently blue. Maybe I should have gotten a gallon, but I still think that's going to be too much.

Once the estoile is finished, I need to cut out the valance and begin painting on it. I still need to pattern it. I thought the pattern was fairly common as an ornament in the illumination corpus, but I'm having some difficulty finding it in two of my big illumination books. There is a Frankish example which will suffice, but if I only had Frederick's Limborg brothers book, I'm guessing it's in there.

Since we replaced the nickel grommets with brass, there is a small amount of re-sewing that needs to happen at the roofline of some of the panels. That's another thing on the "to-do" list.

Robert began to paint the kingpole brown, but it was in the dark, and so we'll see what it looks like in the light of day. In any case, it's a start.

I'm still not sure I have enough canvas for the hoop casing. Maybe another miracle will occur?

8.23.2006

Great resources - medieval tents

http://home.adelphi.edu/sbloch/ma/tents/

8.22.2006

Just paint

Not much progress today - I made it to Lowe's to purchase paint for decorating the roof and the valance. Red. It's going to be a red camp. We'd also decided to paint the king pole woody brown so that it's a little less modern-looking than galvanized steel. Robert wants to wood-grain it, which would be cool, but they didn't have any wood grain stuff at Lowe's today. Well, maybe they did, but I was in a hurry and didn't see it. It can be done later in any case.

I had grand ideas bout drafting the estoile and the valance designs, but fatigue and family took precedence.

It occurs to me that I should be more descriptive about the process. See my flickr account for pictures and details.

8.21.2006

...and then a miracle happened

As of yesterday, I began worrying about the peak. With seven panels together, it was looking more and more like the peak vent was too large, that our steel ring would not fit inside the vent. This would cause a major disruption. Either the peak would have to be pieced to fit the ring, or we'd have to replace the ring - and the ropes to boot. I watched every panel as they were stitched in place tonight. We managed to assemble all ten, although the dreaded final two stitches on the tenth French seam were too formidable for late last night. However, with the installation of the tenth panel, we could tell two things - the ring fits (albeit with very little fudge factor) and the roofline is just under 48 feet in circumference.

Maybe two miracles, then. We don't have an issue with the peak vent, and the 4 yards extra of Sunforger I purchased yesterday will be just enough to do the valance and the PVC hoop casing. It's not that the cost of the Sunforger is prohibitive; it's the hour that has to be dedicated to driving up to the Mousetrap and back. And the gasoline.

While I was measuring roof seams, Robert cut 18' of hoop casing out of scrap. We need 48', so he's not nearly done.

8.20.2006

Seven panels together

Today started out with me making a decision in the shower - the grommets had to be replaced. We'd used some nickel grommets, which reliably split upon hammering on nine out of the ten holes. I chose nickel simply because I felt that the silver color would be a lot less noticeable against the white tent fabric than the brass grommets. However the quality was such that I'm pretty sure I'd be replacing ropes in a season or two and that will not do. We replaced the nickel grommets with brass, which went in flawlessly. Grommets are not period-correct of course, having been invented in the nineteenth century. Another concession to structural integrity, but it'd be nice to have a viable alternative. I could hand-stitch eyelets, but I'm insecure about durability. My kid's sleeping in this tent after all. I just hope it's something that the living history folks can overlook.

Things progressed fairly slowly today, as both Robert and I are still recovering from our late night Friday. We did add three more panels on the tent top, and the eighth panel is pinned in place ready for sewing tomorrow evening. I feel fairly confident that we can finish getting all the panels assembled tomorrow night, although stitching the dreaded last seam may have to wait until Tuesday.

I have reconsidered my decision to make the valance and pole casing out of un-treated canvas. I figure that if this tent gets mistreated - which it will - I don't want to have to replace even a part of the fabric. In the morning, I'll be contacting Davis Tent again, inquiring about colored Sunforger. I don't know what they'll have, so I'm not making plans about color, but I'm thinking that we've got enough red in the camp already.

I've been thinking about the dagging on the valance. I really like the dagging on the tent to the far right of the illustration to the right - it's reminiscent of foliate ornamentations in illuminated manuscripts. But it'll take days to do. I'll probably go with more conventional ovoid dags; they're both easier to make and probably more typical. The valance could also be left un-dagged and painted instead. Hmmm. Maybe white Sunforger would work?

Looking at these original sources brings up another issue - and another project - the Northstar needs a pennon. I'll have to get out the silk painting stuff. Additionally, I'm struck by the amount of color the illustrators used for the tents they painted. Whether this is artistic convention or a reflection of reality I don't know. But my impression is that our SCA camps seem to be unnaturally white from the predominance of white canvas tents.

8.19.2006

Northstar Beginnings

Today started too early considering the time yesterday ended. We languished in bed until Evan began trotting about the house at 8:30. After breakfast I unpacked the remains of the Northstar - the ropes still woven to the steel ring, and the supporting chain structure. While Robert and Savina picked off the leftover rotten canvas and the leather sheath, I made a run to the hardware store.

The morning had started out rainy, but by the time I returned home, the driveway had dried enough to implement Plan A - cutting the canvas outdoors. With the sun beating down, we quickly decided that this project could only be completed if we donned dark sunglasses; we found ourselves "snowblind" from the sun on the white canvas. I had intended to cut the 11' 4" triangles that I'd cut for the first Northstar, but after some discussion with Savina decided to refine the shape a bit.

First, the 11' 7" (includes 3" added for seam allowances) length of the hypotenuse was marked on the selvedge. The the same measurement was marked from the top of the triangle to the opposite selvedge - I highly recommend using a chalk line to get a long straight line. Using the top of the triangle as a pivot point, we then marked a curved edge to the bottom of the triangle. The basic shape is apparent in the photo to the right.

Next, we measured 21" down from the top of the triangle. 21" is the length of the chain assembly that supports the peak of the tent. Figuring that 3" of seam allowance should be needed on the top of the panels, we then backed the measurements up the triangle. Again using the top of the triangle as a pivot point, a curve was marked. The picture at the right is the layout of the measurements (sorry about the camera strap!). We then cut out this first panel - the picture above is our first panel. This panel was then the pattern for the remaining 9 panels. As it turns out, that extra yard of fabric did come in handy; we've got about a foot left of the 21 yards I purchased.

After we got the panels cut out, we moved the operation indoors as the sunshine was getting rather intense. The next step was to install grommets in the seams between the panels. The seams will carry the ropes from the peak assembly to the stake-out points on the ground, and they need an exit. Each grommet was set into a reinforcing square of canvas.

While Savina and I were cutting canvas, Robert was preparing poles. The Northstar requires two kinds of poles - a "kingpole" - the center supporting pole, and roof line poles which support the round shape. Both types of poles require some engineering.

The kingpole needs to be very strong to support the weight of the tent, and it has to be transportable, which means that it has to break down into two pieces. Northstar I had a very clever assembly - the two halves of the steel pole were fitted together with an internal structure of wood and copper which provided rigidity across the seam. The two halves were then locked together with a bushing. If I remember correctly, the pole was 1 1/4" steel pipe. I have opted to rebuild the pole using a similar design. There are some differences based upon what was available at the hardware store then and what was available on Friday. I was able to get both pieces of pipe with threads at one end (the pipe was unthreaded for Northstar I), and a joint which screws together the halves of the pole. To create horizontal stability, Robert epoxied 24" of closet pole into one half of the pipe. To assemble, the closet pole end is slid into the hollow end of the pipe, and the joint is tightened. Steel is obviously not a period material for a kingpole, but for this size of pavilion (and considering the wind it's likely to encounter) a compromise has been made for structural integrity and safety.

The roof line poles need to be lightweight and flexible. We're not using vertical poles at the roof line, and so there needs to be support. There is speculation that round tents in period may have utilized flexible wood support for the roof line, but this is largely conjectural. We're using 3/4" PVC poles to provide the support. The PVC will be completely covered, since I would consider it to be a glaring inconsistency in a period tent. The PVC is contained in a sleeve situated between the valance and the Dutch lacing (details when we get to that part). Each length of PVC has a dowel epoxied into one end; the dowels fit into the hollow end of the next pole, creating a continuous hoop. If the hoop is fit correctly, it's a bit of a struggle to get the last dowel into the first length of PVC, but the seamless result is worth it.

Once the grommets were set, we began to assemble the panels. The panels are joined by French seams, which provide exceptional strength. As mentioned earlier, these seams carry the ropes from peak to ground and at 2" are somewhat wider than what I would normally do.By the time I was "done" this evening, we had stitched together 4 panels, and had pinned the fifth panel to the series.

When stitching such large quantities of fabric, I've found that having a helper to "pull" fabric is indespensible. "Pulling" really isn't the right word - the helper is really controlling the bulk of the fabric. My machine isn't great about feeding, so the helper ends up providing enough tension from the other side of the machine to keep the canvas running through. The helper manages the fabric that's trying to get tangled up at my feet, and maintains the roll of fabric that's being fed under the machine's arm. It helps to keep the panels oriented so that you're only feeding one panel through the machine under the arm - more than one and the volume is simply too great to move the fabric and sew at the same time. This of course implies that sewing that last seam is a monumental challenge - which is all too correct. But you really only want to do that once.

Tomorrow, I anticipate doing that dreaded last seam. When doing some organization in my head this afternoon, it occurred to me that although I planned for enough fabric for the roof panels, I did not consider that I needed fabric for valance and for the roof line poles' casing. I think I'll go over to Denver Fabrics tomorrow afternoon and get some of the $5/yard untreated stuff. It will serve well enough for the "trimmings".

8.14.2006

Additional web content - CGL

I've added pages to the Companie's site.

Much of the content is documenting the work we did yesterday and Saturday.

8.13.2006

Productive and pain


I have to say it was a productive weekend.

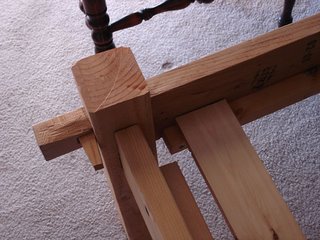
The bed is virtually done. I had to re-engineer pegs for it; decided that longer was better, and reduced the angle. We had it put together in the Hall and bounced around on it for some time, in order that we could feel secure that it wouldn't come crashing in upon us at an inconvenient moment.

Robert took it apart and sanded the posts and rails; it only needs a coat or three of tung oil. On thing unexpected did happen; the queen air 
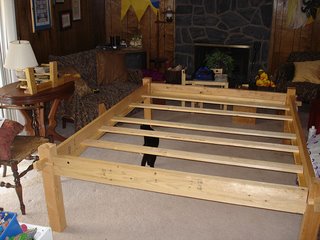
mattress seems very small in it. I checked measurements; the inside dimensions of the frame are 63.75" x 83.75", which is 3.75" wider in all directions than a standard queen. At least we were consistent, and I figure that the extra width ( less than 2" per side) will be amply taken up by bedclothes. However, the air mattress is even smaller - about 9" narrower and wider than the frame. So much for the assumption that the air mattress is a standard queen. It's ok - we don't expect to be using the air mattress forever, and will be replacing it eventually with a more period mattress albeit with a foam core for comfort.

In bouncing about on the thing, we did discover that the whole thing seems to pitch a little like a a waterbed. It seems that the rocking of the joints is transferred to and increased by the air mattress. In addition, I feel like I'm perched atop the mattress, and will probably loose some sleep maintaining my balance.

Although the bedstead is done, the bedding is another matter entirely. Besides the aforementioned Medieval-style mattress, I scored some $1 a yard white linen at Denver Fabrics which will become sheets. And we need blankets. And pillow covers. And (sorry, Robert) a headboard to keep the pillows in place. I have a cunning plan for a headboard, but I know that Robert won't like cutting any new mortises. He's good at them, but they're a complete pain.

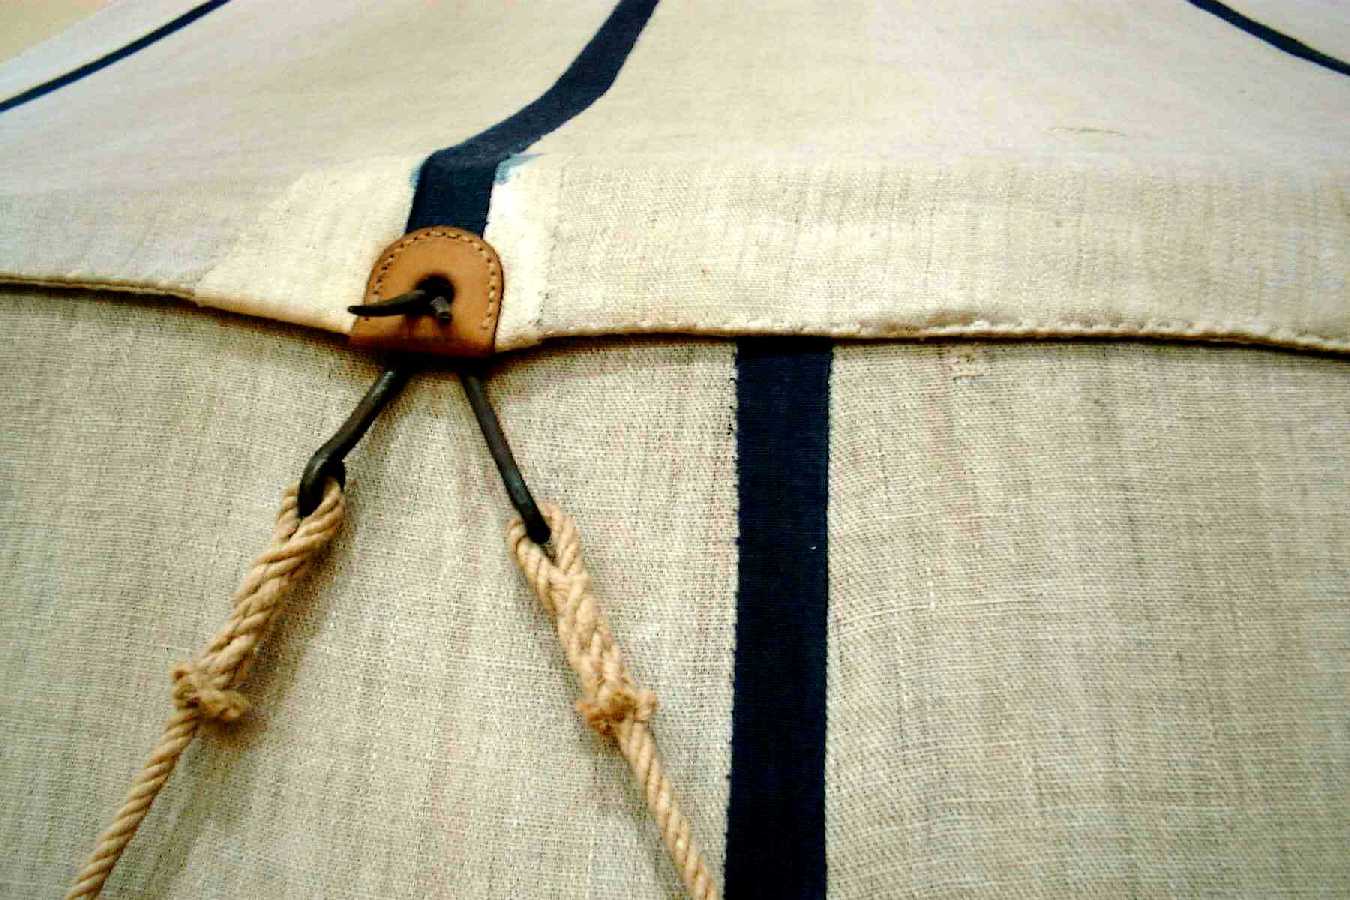
There is only one problem with finishing the bed. To use it, we will need to rebuild the Northstar, our 16" round pavilion. The top was the victim of neglect (first) and over-zealous scrubbing to get rid of the resulting mildew (last). It's gonna take 20 yards of canvas and a weekend to get a tent in which our decadent bed will fit.

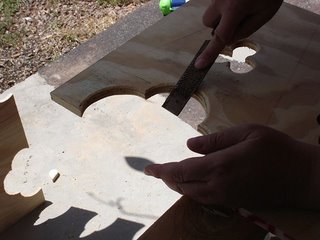
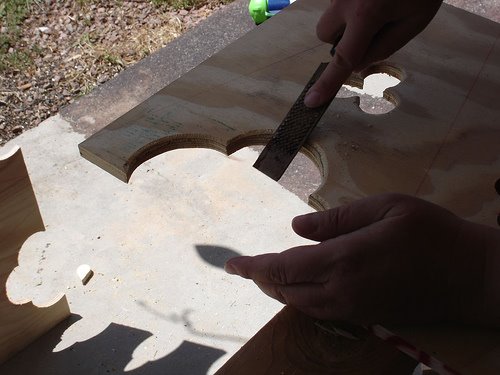
The bed wasn't the only accomplishment this weekend. I nearly built eight sets of table legs for period camp dining. For the first set I did - legs for the kitchen tables - I was clever enough to make a template of the triangle-shaped brace that creates the characteristic shape of Gothic-style table legs. So it's pretty easy to lay out a half-dozen of the things on a 2' x 4' sheet of plywood. After cutting out the trefoil and cusps with a jigsaw, I then give the cut-outs some dimension with a rasp. The look is similar to that achieved with a router, but more rustic. Since the jigsaw is fairly imprecise, the rasp also lets me refine the shapes and fix any bobbles. After I have finished all the sawing and shaping for all six braces, I then cut the braces apart. Leaving them all together makes it easier to manage them ; the weight and length of the panel provides some stability when doing the shaping.

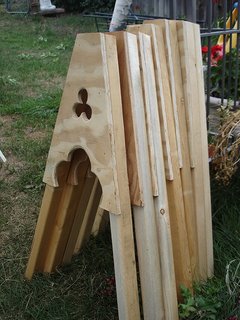
The braces are then nailed with finishing nails to the legs. (What happened to the days when I could drive a nail in three strokes?) The 1x1 legs are cut at 75 degree angles to get the "A" shape, and so that the bottoms of the legs rest flat on the ground. The dining-height legs are cut to 28.5", which with the addition of a crossbeam and the table top should make approximately 30", the height of a standard modern dining room table.

The legs are painted with "milk paint", a period type of paint. It happens that when I visited the local woodcraft shop, the "milk paint" didn't have any milk in it at all - I'm pretty sure it's really a latex. But the color is good, a bright barn red.

The legs aren't stained because I want a more typical (period) finish. Although stain was not unknown, wooden surfaces were usually finished with a clear medium like linseed oil or beeswax, or painted.

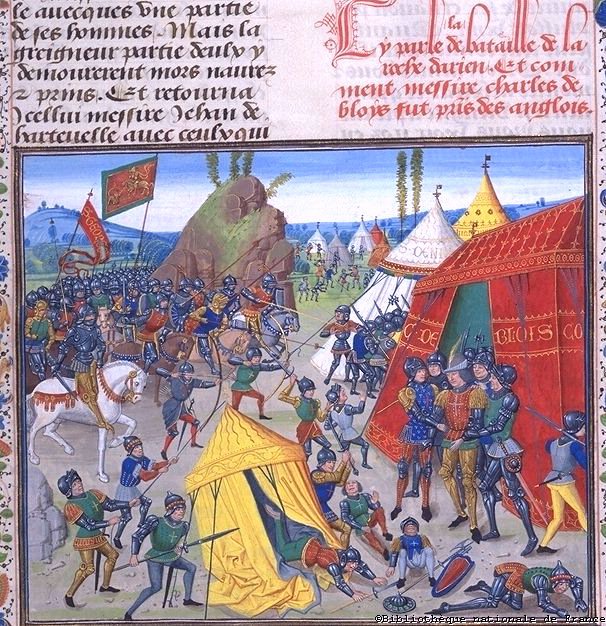
The first set of legs (the kitchen "counters") was patterned after the three-legged "sawhorse" shapes seen in many Medieval manuscripts. Legs in Luttrell are seen with the "A"-shaped braces, and although we cannot see the back leg(s), it's easy to assume the three-legged variety based on some of the other tables that we see in the illuminations. However, we found this arrangement to be somewhat rickety. There are a couple of modifications that might help the situation.

1) I could add a horizontal stretcher to the "A", which would be in turn attached perpendicularly to the rear single upright leg. The problem is breaking down this arrangement into something packable.

2) I could use an "A" on both sides of the table, changing the arrangement from a tripod to a quadripod. This would strongly resemble the modern sawhorse, and would be easy enough to engineer as a break-down design for transport, but I have not yet been able to justify the "sawhorse" design as period. Of course, I would need twice the number of "A"s, which would equal four to a table. Handily, I have 7 built currently and another 6 begun on another panel. I could easily get enough done for two tables before Three Stags.

Three Stags is of course the objective and one of the reasons why these weekends need to be productive. Evan's bed remains to be finished, and I need to complete at least one dining-height table by then. And clothes - we need clothes. The pace is frenetic, and I have pushed myself beyond where I should have gone today. My right hand and wrist are very sore from the continual sawing, rasping and ultimately painting (I got most of the painting done on the legs before the rain came in tonight). I've got Advil on-board, or I'd not be typing right now.

I expect that Advil will continue to be my friend as I over-extend myself in the next three weeks.

8.07.2006

Fire restrictions

The message has come out from the 3 Stags autocrat - no open fires. The way she put it, it could change, but I'm not holding out hope.

This is gonna make cooking authentic-style really tough.

pffft!

GFD progress

Robert and I have been planning for Three Stags, Labor Day weekend. Since I've gained some weight, my Gothic fitted dresses (GFD) aren't fitting so well, and so I had cut out three new ones a couple of months ago.

I had Savina make me a template last fall, from which I made the red GFD that I wore to the Pas d'Armes. Although I think that the body is ok, the sleeves on it need to be re-engineered to not cut into my armpits at the front. I used the same template for the three new ones. Since we had a sewing party here this weekend, I stitched the brown GFD together, and had Savina take a whack at fitting the bustline.

The thing is that you can use a template to cut out a GFD, but every one must be custom-fitted to the body to insure the correct shape and bust support. Linen is the preferred lining, and worsted wool the preferred fashion layer. The linen supports the bust and also stretches on the diagonal to create the correct shape.

The one I worked on this weekend is brown worsted wool, lined with an olive-forest green linen. The four lining pieces are first stitched wrong-sides together with the four fashion layer pieces at the neckline. The necklines are then clipped and turned. Because I'm leaving this GFD open for lacing, I also stitched linings to fashion layers down the front centers with the wrong sides together. Everything is pressed. For the remainder of the lining, I use a flat lining technique, treating all layers as one, and then finishing the interior seams after construction. The four parts - two fronts and two backs were then stitched together at the sides and center back.

This GFD is a bit of a departure from the way I usually build them, because instead of leaving the center front seam stitched closed, I'm lacing it closed. This meant that to achieve the proper fitting, I had to be sewn into the GFD at the front. I laid down on the floor, and Savina and Rivka pushed, lifted, and pinned, and we've got a preliminary shape. I discovered that the front neckline is way to high and narrow, and will have to be re-constructed. This would be the logical next step, along with stitching the side seams along the new lines. However, I've departed from logic, for the sake of expediency.

Since Savina was at hand, I asked her to demonstrate sewing eyelets into the front of the GFD for me. I've tried them, but they looked horrible, and so I've asked the expert. They're really not too bad, but I do need to find my thimble. She offered to do them on her machine, but I need to do them by hand, mostly because I'd be handicapped if I didn't have her machine handy. Not very workable to not do them by hand then.

Although the final shape hasn't been achieved, I figure that if I get the lacing holes sewn now, when doing the next fitting step I can lace it up and get a better fit. And I won't have to be sewn into it. I'm using a sewing needle as a bodkin, but it's really not quite large enough, and so it'd be nice to find my real, authentic bodkin. And I really do need to reconstruct that neckline before I put any eyelets into fabric that I'm cutting away. I may be sewing the eyelets by hand, but I'm not crazy!

8.03.2006

Three Stags

Less than a month to Three Stags.

I am of course bringing the cucina per capagna, which means that we're going to have to get *real* creative about packing. Because it fits in the minivan, but there's not much room for anything else. I need to make another set of tables and legs, and repair the tent. The bed's virtually done, but I don't think it'sll fit in the double-bell.

Ok, this is beginning to look overwhelming again.

Just when it was beginning to feel exciting.

Ok, maybe it's not all bad

Went to the baronial polling tonight. I was gratified at the warm reception that we received, especially considering our low level of participation lately. There were lots of hugs, and we did some very real business.

Just when I feel I have had no impact, Rivka tells me that she'd gotten loads of compliments on her dress tonight - one that I'd made.

Talking to Robert on the way home, I realized that I still know how to motivate, but I don't know how to motivate myself.

8.02.2006

Where's the Magic?

Something "broke" in me a few years ago. After years of working toward making change in the SCA, it suddenly slapped me in the face like a Buffalo snowstorm - it hadn't made a bit of difference. People laughed at "period". People resisted "period", made all sorts of excuses about being not period, and steadfastly refused to consider making more period choices at all. It seemed as if no one had noticed, and if they had, my efforts were viewed with derision rather than respect.

Yes, it was all about me that night. I could certainly have extrapolated those feelings to the other 6 people in the kingdom who were doing the authenticity thing, because I'm pretty sure they feel the same way. Although I didn't that night, I have since.

Since then, it's not gotten much better. It seems that I'm utterly disenchanted with the SCA. It's not that chocolate still seems to be the feast desert of choice, or that the battle cry, "WAR" sounds for all the world like "PAR-TEEE" to me. It's not the belly dancers dressed in 19th century outfits or that people still go out on the tournament field in blue plastic armor. It's that they aren't even trying.

It's all about choices, and people keep making choices that are worse rather than better, because in the SCA we *can*. We've got this notion that we have to be sensitive to people's feelings, that we can't be critical of what people do because the SCA is supposed to be some sort of big tent that includes whatever comes along.

Rubbish.

Why shouldn't we affect change toward more faithful representations of this period that we're supposed to be studying? Why shouldn't we teach people to make better choices? To dance a pavane rather than the Korobushka? To buy the linen for one good dress rather than the crushed velvet for several? To make peeres in syrup rather than brownies for desert? Because their feelings will get hurt? The dirty little secret of the SCA is that not everyone belongs here. And that's OK.

I used to think that people really knew and abided by the SCA's purposes as states in section II of the Articles of Incorporation: "...to present activities and events which re-create the environment of said era, such as, but not limited to, tournaments, jousts, fairs, dances, classes, et cetera; to acquire authentic or reproduced replicas of chattels representative of said era..." I had a naive faith in the goals of my fellow members, that we were somehow all on the same path. Once the rose-colored glasses came off, I haven't been able to look at the SCA the same since.

I am trying to find the magic again, really I am. It's hard to see beyond the Wheel of Jell-O and the mounds of mashed potatoes. Someone please tell me why I'm here, because I've forgotten.